
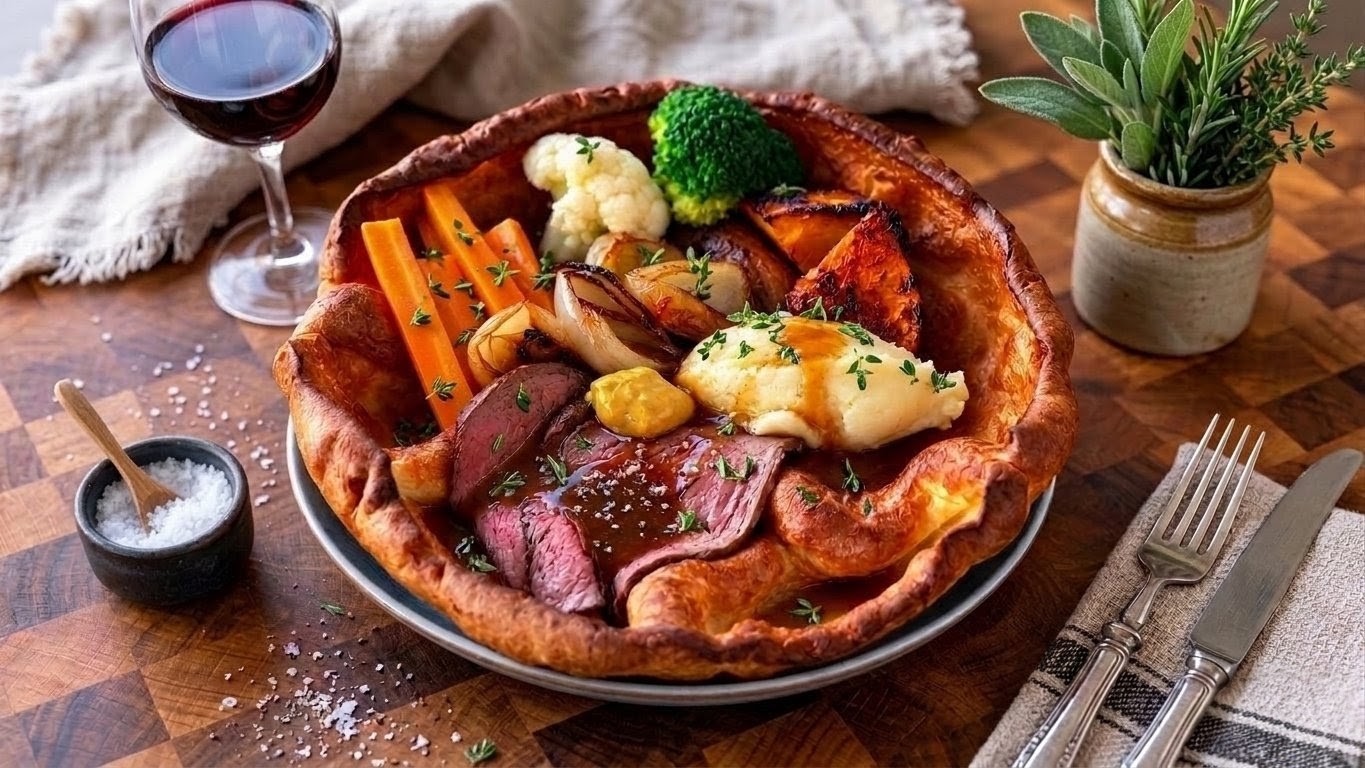
Roast Rump Cap, Giant Yorkies, Butter Mash & Proper Beef Gravy
Proper roast beef, giant Yorkies and proper gravy. All the flavour.
Beef rump cap, also known as picanha or sirloin cap, is a tender, triangular cut of beef with a thick, flavourful layer of fat on one side. Each portion gets its own giant Yorkshire pudding, loaded up with the whole roast.
WHY IT WORKS This dish works because every stage builds on the one before it. The rump cap is seared fat-side down first, so that thick fat cap renders properly and colours before the beef ever sees the oven. Starting with about 50 g tallow gives you plenty of fat to work with, and the tallow and rendered beef fat are reserved for both the Yorkie batter and coating the pan for each Yorkie. Roasting at 155°C and pulling the beef when the centre hits 55°C means you cook by temperature, not blindly by the clock. Resting the beef gives you those all-important juices for the gravy, while the browned bits left in the original searing pan give the gravy its proper beef flavour. The first Yorkie starts in a cold pan with cold fat, then the remaining Yorkies are made in the same pan once it’s already hot. That’s the whole point of the test: once they’re all cooked, see if you can actually tell which one started cold.
- →Rendering the fat cap in the pan before roasting builds both colour and flavour, and gives you usable beef fat for the Yorkies.
- →Roasting at 155°C and pulling the beef at a centre temperature of 55°C cooks by temperature, not by time.
- →Resting the beef collects the juices that go straight into the gravy; they are not wasted.
- →The rendered beef fat is used twice — in the batter and in the pan — so nothing flavourful is thrown away.
- →Deglazing the same searing pan with stock, wine, Worcestershire and thyme turns browned bits into proper beef gravy.
- →Cold-pan, cold-fat Yorkies avoid handling hot fat while still rising crisp and golden.
Common Mistakes
- ✗Rushing the fat-cap render. A quick sear leaves the fat undercooked and chewy instead of crisp and flavourful.
- ✗Trusting the timer instead of the probe. Start checking the centre temperature early because every rump cap is a different size and shape.
- ✗Binning the rendered fat and resting juices. Both carry the best beef flavour in the whole dish.
- ✗Overmixing the Yorkie batter. A few small flour lumps are far better than a tough, elastic pudding.
- ✗Opening the oven too early. The first Yorkie needs 12–15 minutes undisturbed to rise and set its structure.
- ✗Skimping on pan fat. Each Yorkie needs enough to coat the bottom of the pan properly or it will stick.
- ✗Cranking the oven back up between Yorkies. Once you drop to 200°C, leave it there.
Tips & Tricks
- →Render the rump cap properly. Give that fat cap time to render and colour rather than just giving it a quick sear.
- →Save the beef fat. The combination of tallow and rendered rump-cap fat goes straight into the Yorkie batter and pan.
- →55°C is your target, not 1 hour. The size, shape and starting temperature of the beef will change the cooking time.
- →Rest the beef properly. Keep every drop of those resting juices for the gravy.
- →Use the same pan for the gravy. Those browned bits left behind after searing the beef are free flavour.
- →Rice the potatoes. It gives you smooth mash without overworking the potato.
- →Butter goes in after ricing. Diced butter, salt and white pepper, then beat it in like you mean it.
- →Don't overmix the Yorkie batter. A few wee bits of flour are absolutely fine. Mix it, rest it and leave it alone.
- →Batter depth matters more than an exact amount. Aim for roughly 5–10 mm across the bottom of your pan.
- →Use enough fat. Make sure the bottom of the pan is properly coated before each Yorkie so it doesn't stick.
- →Test the cold-pan theory yourself. The first Yorkie starts with a cold pan and cold fat. The rest inevitably start in the now-hot pan. Put them side by side at the end and see if you can tell which was which.
- →Leave that oven door alone for the first 12–15 minutes. Let the first Yorkie rise and build its structure before having a wee peek.
- →Once you drop to 200°C, leave it there. There's no need to keep cranking the oven back up between Yorkies.
Flavour Twists
Serve a bowl of horseradish cream on the side alongside the English mustard. It cuts through the richness of the beef and Yorkies beautifully.
Swap the butternut pumpkin for parsnips cut into chunks. They roast sweet and pair hard with the beef gravy.
Stir a teaspoon of English mustard into the finished gravy for a subtle heat that lifts the whole plate.
Substitutions
- Tallow→ A normal cooking oilUse a neutral high-smoke-point oil if tallow is unavailable or you prefer it. Keep the rendered fat from the rump cap and mix it with the chosen oil for the Yorkies.
STORAGE Leftover roast beef, vegetables, mash and gravy can be refrigerated for up to 4 days when properly cooked, rapidly cooled and correctly stored in sealed containers. Yorkies are best eaten fresh, but if you have leftovers, reheat them in a hot oven until properly heated through and crisp again.
Something bold to drink
A big shiraz or malbec, or a dark ale. Horseradish on the side is always welcome.
Temperature over time, not time alone.
Method
- 1
Get the beef going
STEP 1 — GET THE BEEF GOING Get about 50 g tallow into a pan and put the rump cap in fat-side down. Take your time and properly render that fat. Once you’ve got good colour on it, briefly seal the bottom and the ends. Season it hard with salt and black pepper. Remove and reserve the tallow and rendered beef fat. You’ll need enough for both the Yorkie batter and for coating the pan for each Yorkie, so don’t chuck any of it. Leave all those lovely browned bits in the searing pan and set the pan aside. We’re coming back to it for the gravy.
- 2
Roast the beef
Put the halved onions underneath the beef and sit the rump cap on top, fat-side up. Scatter the butternut pumpkin around the outside. Roast at 155°C for about 1 hour, but forget blindly following the clock. You're looking for the centre of the beef to hit 55°C. Once it's there, get it out and let it rest properly. Temperature over time, not time alone. Keep every drop of those resting juices. They're going straight into the gravy.
- 3
Make the mash
Cook the potatoes until completely tender, drain them well, then pass them through a potato ricer. Add the 50 g diced butter. No milk. No cream. Then beat it in like you mean it. Season properly with salt and white pepper.
- 4
Make the giant Yorkies
Whisk together 4 large eggs and 200 ml full-fat milk, then add 200 g plain flour and mix just until combined. Don't overmix it. A wee few bits of flour left in there are far better than batter that's been beaten to death. Rest the batter. Mix through 2 tablespoons of the tallow and rendered beef fat from searing the rump cap. The exact number of Yorkies you get will depend on the size of your pan. Pour in enough rested batter to give you roughly 5–10 mm of batter across the bottom. For the first Yorkie, add enough of the reserved beef fat and tallow to a cold pan to properly coat the bottom. Don't be shy with it. You don't want the Yorkie sticking. Pour in the rested batter and get it straight into the oven as hot as your oven will go. Yep, cold pan and cold fat. For years, celebrity chefs have told us the fat and the pan have to be screaming hot before the Yorkshire pudding batter goes in, mostly because that's how they were shown to do it, so that's how it keeps getting passed down. Sometimes nobody stops to ask whether it actually needs to be done that way. Do not open the oven for at least 12–15 minutes. Then open the door, have a wee peek and let some of that excess steam escape. Turn the oven down to 200°C and finish the Yorkie until properly risen, crisp and golden. Remove the Yorkie, then add enough of the reserved beef fat and tallow back into the pan to properly coat the bottom again. You don't want the next one sticking. Pour in the next lot of rested batter and repeat. Leave the oven at 200°C from this point. There's no need to turn it back up between Yorkies. Continue until you've made enough giant individual Yorkies, one per person. And here's the interesting bit: once they're all cooked, see if you can actually tell which Yorkie was the one that started in the cold pan. Try it yourself and see whether the screaming-hot pan actually makes a difference. Starting cold also means no handling a pan full of screaming-hot fat and no fat spitting back at you when that first batter goes in.
- 5
Crisp the onions & pumpkin
Once the Yorkies are finished, get the onions and pumpkin back into the 200°C oven. They've already cooked underneath and around the beef and soaked up all that flavour. Now you're giving them a final blast of heat to colour up and crisp around the edges.
- 6
Cook the veg
Cook the broccoli and cauliflower florets and carrot batons until tender but still with a bit of life about them.
- 7
Make the beef & thyme gravy
STEP 7 — MAKE THE BEEF & THYME GRAVY Go back to the same pan you seared the beef in. All those lovely browned bits should still be sitting there. That’s flavour. Add the 25 g butter and fresh thyme, then stir in the 25 g flour. Cook for 1–2 minutes, scraping up all that beefy goodness from the bottom. Add a good splash of red wine and let it reduce a little. Gradually whisk in the 500 ml beef stock, then add the Worcestershire sauce. Simmer gently for 5–10 minutes until smooth, glossy and thickened. Once the beef has rested, pour every drop of those resting juices into the gravy. Or, if you have to, for ease, skip the butter and flour and use your favourite gravy granules instead. Add them to the stock, red wine, thyme, Worcestershire sauce and those all-important beef resting juices until you’ve got the flavour and consistency you want. Taste before adding any extra salt and black pepper.
- 8
Bring it all together
Put a giant Yorkie on each plate and load the roast inside it. Slice the rested rump cap, keeping that beautiful rendered fat on top. Add the buttery mash, crispy onions and pumpkin, broccoli, cauliflower and carrots. Get that beef and thyme gravy over the lot, add a good spoonful of English mustard, then finish each portion with a few fresh thyme leaves. Done.
Cook with it
Leave a comment
Drop your name, email and a note — I read every one.