
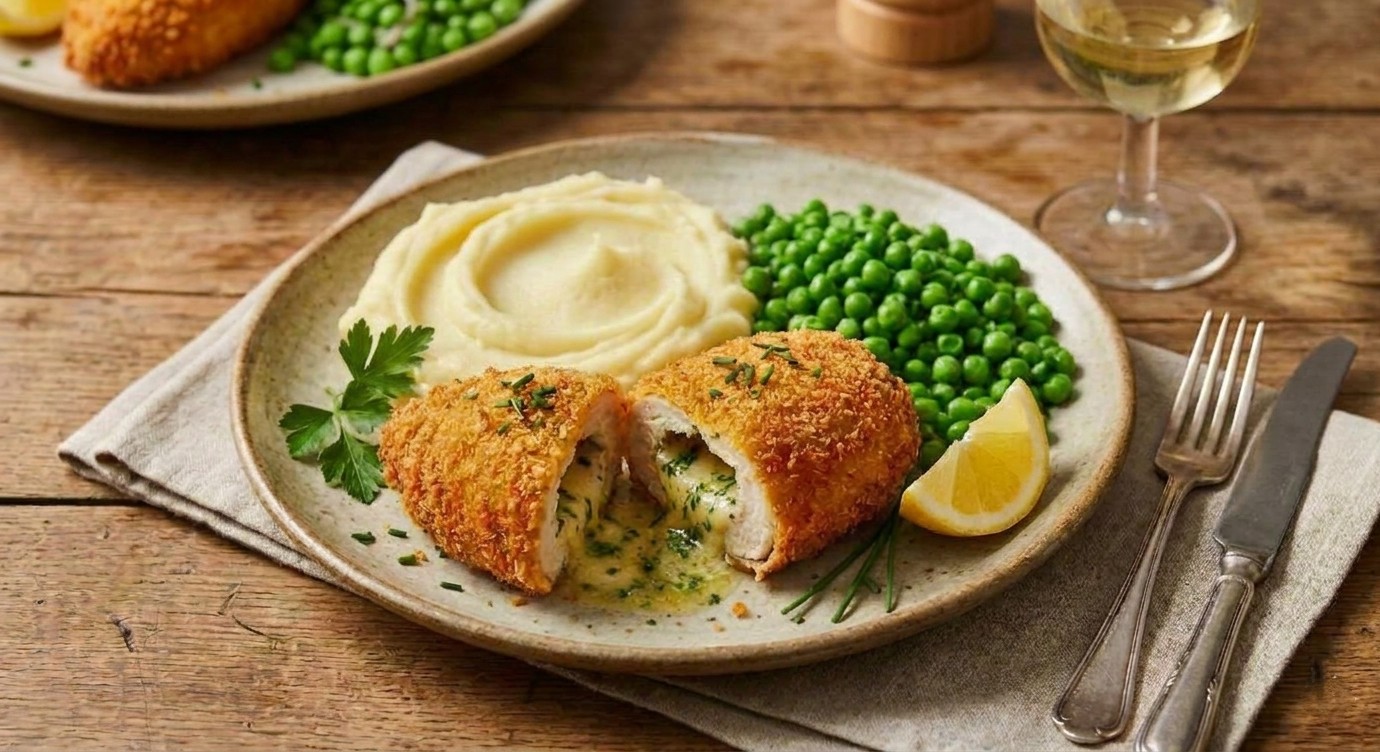
Chicken Kiev
Chicken stuffed with enough garlic butter to make your life choices questionable.
Most Chicken Kiev disasters happen because people focus on the garlic butter and forget the chicken. The butter has to be frozen, the chicken has to be wrapped tight, and the crumb has to be thick enough to hold the whole thing together when it hits the oil. Get those three things right and when you cut into it the garlic butter doesn't politely ooze out — it makes a run for the mashed potatoes.
Cooked for a mate whose partner was after a proper kiev — with thanks to Suspicious Carrot — thesuspiciouscarrot.com
Frozen garlic butter buys you time. While the crumb is setting in the oil and the chicken is coming up to temperature in the oven, the butter is still solid in the middle. By the time it melts, the crumb is locked and the chicken is cooked, so the butter has nowhere to go except inside the parcel. Double crumbing (flour, egg, panko, egg, panko) builds a wall thick enough to survive the shallow fry without cracking. Shallow-frying first colours and seals the crumb, then the oven finishes the chicken gently so the breast hits 72 °C without going dry. Rest carries it through to 74 °C plus — safe, juicy, and the butter only escapes when you cut in.
- →Heat control decides texture. Push too hard and ingredients toughen or split; stay gentle where needed and the dish keeps its shape.
- →Fat carries flavour. Blooming spices, herbs or aromatics in fat spreads their flavour through the whole dish instead of leaving it patchy.
- →Acid and salt finish the job. A final taste-and-adjust is what turns cooked ingredients into a finished recipe.
- →Contrast keeps the plate interesting. Crunch, herbs, spice, creaminess or a sharp finish stops rich food becoming one-note.
Common Mistakes
- ✗Soft butter. If it's not frozen solid going in, it melts during the fry and pisses out through the seam before the crumb is set.
- ✗Loose wrapping. Any gap in the chicken parcel becomes a butter exit. Roll tight, no air pockets.
- ✗Single crumbing. One pass of flour-egg-panko will crack. Double it — flour, egg, panko, egg, panko.
- ✗Skipping the chill stages. Both the 1-hour fridge after wrapping and the 30-minute fridge after crumbing are there to set the shape — skip them and the whole thing falls apart in the pan.
- ✗Flattening the chicken to schnitzel thickness. Too thin and there's no room for the butter pocket, plus the chicken overcooks before the crumb colours.
Tips & Tricks
- →Plan around the butter. The longest part of this recipe isn't the cooking — it's waiting for the garlic butter log to freeze solid (at least 1 hour) and the wrapped Kievs to chill (another hour). Do the butter the night before and the rest is quick.
- →Probe into the chicken, not into the butter pocket — butter melts well before chicken is cooked and a probe sitting in melted butter will read high.
- →If the butter feels soft at any point during wrapping, put it back in the freezer for 10 minutes. Soft butter inside the chicken leaks every time.
- →Press the panko on with the heel of your hand on the second coat — loose crumb is where cracks start.
- →Use floury potatoes for the mash. Waxy potatoes will give you wallpaper paste.
Flavour Twists
Swap two of the raw garlic cloves for smoked garlic, grated the same way. Adds a barbecue note without changing anything else.
Add 1 tbsp finely chopped tarragon to the garlic butter. Pushes it towards the French side — works brilliantly with the lemon zest already in there.
Add the zest of 1 lemon and 30 g finely grated parmesan to the panko on the final coat. Sharper, savoury crust.
Substitutions
- Panko breadcrumbs→ Homemade dried breadcrumbs from stale white bread, blitzed coarseNot as shatter-crisp as panko but still works. Avoid the fine sandy supermarket breadcrumbs — they go soft.
- White pepper→ Finely ground black pepperBlack pepper changes the look of the butter and the crumb slightly but the flavour holds up fine.
- Chives→ More parsley, or finely sliced spring onion greenStay green and fresh — don't reach for dried herbs here.
Best eaten straight away — the crumb is at its peak the moment it comes out of the oven. Uncooked, crumbed Kievs hold 24 hours in the fridge tightly wrapped, or freeze on a tray until solid then bag for up to 1 month. Cook from frozen: shallow fry the same way, then finish in the oven for 20–25 minutes at 180 °C, still pulling at 72 °C internal. Cooked leftovers keep 2 days in the fridge — reheat at 180 °C for 10 minutes until the centre is hot through; microwave kills the crumb.
Keep the spice warm, not harsh. Bloom powdered spices briefly in fat so they taste rounded, then finish with fresh herbs, citrus or pepper for lift. If the spice tastes dusty, it needed more fat and time at the start; if it tastes bitter, the heat was too high.
Mash, peas, dry white
The mash is there to catch the butter. The peas cut through the richness. A crisp dry white handles the fat, and a cold lager works just as well. Anything heavier fights the butter.
Food works better when you understand it.
Method
- 1
Make the garlic butter
Mix the 200 g softened butter, 6 grated garlic cloves, 2 tbsp parsley, 1 tbsp chives, zest of 1 lemon, 5 g salt and 1 g white pepper in a bowl until evenly combined.
- 2
Log it and freeze
Tip the garlic butter onto cling film, roll into a log about 2 cm thick, wrap tight and freeze until solid — at least 1 hour. Frozen is the whole point, don't shortcut this.
- 3
Portion the butter
Once solid, cut the log into 4 equal pieces of roughly 40 g each. Keep them in the freezer until the moment you wrap the chicken.
- 4
Butterfly the chicken
Lay each chicken breast flat and butterfly it open. Place between two sheets of baking paper.
- 5
Flatten — but don't murder it
Gently flatten with a rolling pin until evenly thick. You're looking for enough room to wrap the butter, not turn it into a schnitzel. Even thickness matters more than thinness.
- 6
Season
Season both sides of each breast with the 8 g salt and 2 g white pepper split across the four.
- 7
Wrap the butter inside
Place a frozen 40 g garlic butter portion in the centre of each breast. Fold the sides over and roll tightly into a barrel shape — no gaps, no air pockets. Gaps are where the butter escapes.
- 8
Chill the parcels
Wrap each Kiev tightly in cling film and refrigerate for at least 1 hour. This sets the shape so the crumb has something firm to stick to.
- 9
Set up the crumbing station
Three trays. Tray one: 100 g plain flour with 5 g salt and 2 g white pepper, mixed. Tray two: 3 beaten eggs. Tray three: 250 g panko.
- 10
Double crumb
Coat each Kiev in this exact order: flour, egg, panko, egg, panko. Double crumbing isn't optional — it's the difference between garlic butter on your plate and garlic butter all over your oven tray. Press the panko on firmly each time.
- 11
Chill the crumb
Sit the crumbed Kievs on a tray and refrigerate for 30 minutes. This locks the crumb to the chicken so it doesn't slide off in the pan.
- 12
Preheat the oven
Oven on at 180 °C.
- 13
Shallow fry
Heat a frying pan with enough neutral oil to come about 1 cm up the side, over medium heat. Cook the Kievs, turning regularly, until evenly golden all over — about 3–4 minutes total. You're colouring the crumb, not cooking the chicken through.
- 14
Finish in the oven
Transfer the Kievs to a tray and finish in the 180 °C oven for 10–15 minutes depending on size.
- 15
Pull at temperature — non-negotiable
Pull when the thickest part of the chicken reads 72 °C on a probe. Probe into the meat, not into the butter pocket — butter melts faster than chicken cooks and will give you a false high reading.
- 16
Rest
Rest for 5 minutes. Carryover takes the chicken up to 74 °C plus — safe, juicy, and the butter stays put until you cut in.
- 17
Proper mash
Start this when the crumbed Kievs go into the fridge for their 30-minute chill — mash from scratch takes longer than the Kievs do in the oven. Peel and chop the 800 g potatoes, cover with cold salted water, bring to the boil and simmer until a knife slides through with no resistance (about 20 minutes once boiling). Drain well and pass through a ricer — no ricer, no proper mash. Beat through the 100 g butter first, then the 100 ml warm milk. Season with salt. Keep warm with a lid on while the Kievs finish.
- 18
Buttered peas
Warm the 250 g frozen peas through in a pan with a splash of water. Drain, finish with the 20 g butter, salt and black pepper.
- 19
Serve
Mash on the plate, Kiev on top, peas to the side. Cut in at the table so everyone sees the butter run.
Cook with it
Leave a comment
Drop your name, email and a note — I read every one.